

In a world where our lives increasingly unfold in public view, creating secluded outdoor spaces has become essential for mental wellbeing and relaxation. Whether you’re dealing with a suburban yard overlooked by neighbors, an urban rooftop, or a rural property with expansive views, transforming exposed areas into private retreats requires thoughtful design and strategic implementation. Drawing from years of creating secluded sanctuaries for clients across diverse landscapes, this guide offers practical solutions to carve out your own private oasis.
Understanding Privacy Needs in Outdoor Spaces

Before embarking on any privacy project, it’s crucial to assess your specific needs. Through my experience designing outdoor retreats, I’ve found that privacy requirements typically fall into three categories: visual privacy (blocking sightlines), auditory privacy (managing sound), and psychological privacy (creating a sense of enclosure and security).
Privacy Assessment Checklist
| Factor | Questions to Consider | Potential Solutions |
|---|---|---|
| Visual Exposure | Which areas are most visible to neighbors? | Strategic plantings, screens, pergolas |
| Noise Issues | What sounds are most disruptive? | Water features, sound-absorbing plants |
| Wind Exposure | Are there prevailing winds that create discomfort? | Windbreaks, structural elements |
| Sun/Shade Patterns | Where does sun hit hardest during key usage times? | Canopies, pergolas, shade trees |
| Seasonal Changes | How does privacy change throughout the year? | Mix of deciduous and evergreen elements |
| Privacy Priority Zones | Which areas need the most privacy? | Concentrated design elements in key areas |
 Heat Reflection and Absorption in Material Selection: A Designer’s Guide
 Character Creation in Standard Apartment Layouts: Transforming Cookie-Cutter Spaces into Personal Sanctuaries
 The Art of Outdoor Rug Placement for Defined Spaces
 Asymmetrical Balance in Modern Room Design: A Comprehensive Guide
Creating Enclosed Spaces With Strategic Landscaping

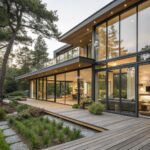
The foundation of any private retreat begins with establishing boundaries. In Monument and Black Forest, Colorado, we recently transformed an exposed backyard into a serene sanctuary using layered landscape elements.
Landscape designer Lisa Stryker emphasizes that the most effective private retreats utilize multiple layers. This approach, she notes, creates a sense of depth and avoids the feeling of being boxed in, which can make spaces seem smaller.
Effective Privacy Screening Methods
- Living boundaries: Install tall, lush hedges using dense foliage plants that create natural shields
- Elegant fencing: Consider materials like cedar or bamboo for both privacy and aesthetic appeal
- Strategic gates and arbors: Place these elements to maintain invitation while ensuring security
- Layered plantings: Create depth with plants of varying heights and densities
For a client in Westfield, we designed a living wall using movable planters that provided flexibility while creating a lush privacy screen. “I love how the planters allow me to reconfigure my space based on the season or my entertaining needs,” the client shared afterward.


Designing Intimate Seating Areas

The heart of any private retreat lies in thoughtfully designed seating areas. When working with exposed spaces, I’ve found that defining these areas clearly helps create a psychological sense of enclosure even before adding physical privacy elements.
Elements of Successful Seating Areas
- Pergolas and trellises: These structures create overhead definition while supporting climbing plants
- Recessed lighting: Integrated lighting in steps and structures defines spaces in evening hours
- Deep-cushioned furniture: Comfortable seating encourages lingering and relaxation
- Ambient lighting: Soft lighting creates peaceful atmosphere and visual boundaries at night
In a recent Black Forest project, we installed a cantilevered aluminum pergola above a dining area, complemented by a custom concrete fire table and floating wooden bench. The client later remarked that the space felt “like being transported to a high-end resort” despite being just steps from their back door.


Utilizing Vertical Space Effectively

When horizontal space is limited, vertical elements become crucial privacy tools. In urban settings where neighboring buildings overlook outdoor spaces, vertical solutions provide critical privacy without sacrificing precious square footage.
Urban landscape architect Jean Lin highlights the dual benefits observed in a Manhattan rooftop project where vertical gardens were installed. These elements successfully provided privacy from adjacent buildings while simultaneously improving the microclimate, enhancing comfort throughout the year.
Vertical Privacy Solutions
- Living walls: Install systems with irrigation for lush green coverage
- Climbing vines: Train on cables, trellises or pergolas for seasonal coverage
- Tall planters: Use raised containers with dense, tall plants to create natural screens
- Vertical lattice panels: Combine with plantings for filtered privacy
Strategic Placement of Privacy Elements

Location is everything when creating private retreats. After designing hundreds of outdoor spaces, I’ve found that understanding how a space is used throughout the day and year is crucial for effective privacy design.
Outdoor living expert Emily Eerdmans cautions against focusing solely on obvious sightlines. She stresses the importance of considering dynamic factors like sun patterns, seasonal shifts, and how people move through the space when assessing privacy requirements.
For a Catskills retreat, we designed cabins with expansive glass doors. The architect explained how strategic overhangs were crucial; they block rain and snow, allowing visitors to keep windows open in any weather. This design fosters a connection with nature while ensuring protection and privacy, creating an experience akin to a living landscape painting.
Material Selection for Privacy Elements

Choosing materials that harmonize with both the architectural style of your home and the natural surroundings is essential for creating a retreat that feels organic rather than fortified.
Material Comparison for Privacy Elements
| Material | Durability | Maintenance | Privacy Level | Best For |
|---|---|---|---|---|
| Cedar | High | Moderate | Medium-High | Natural settings, traditional homes |
| Black stained cedar | High | Low | High | Modern/contemporary settings |
| Bamboo | Medium | Low | Medium | Tropical/Asian-inspired spaces |
| Corten steel | Very High | Very Low | High | Industrial/modern designs |
| Channel glass | High | Low | Medium | Contemporary spaces needing light |
| Stone/concrete | Very High | Very Low | High | Permanent solutions, sound blocking |
The influence of material choice on privacy perception is exemplified in a Big Sur project described by its architect. Standing seam copper was used for the main volume parallel to the canyon. According to the architect, this material reflects and scatters light, creating a dynamic effect that shifts focus from the structure towards the natural environment.


Water Features as Privacy Enhancers
Water elements serve dual purposes in private retreats: they create soothing white noise that masks unwanted sounds and serve as visual focal points that draw the eye away from boundaries.
A landscape designer shared an example from Atlanta where a custom concrete water feature was installed on a lower deck. This addition fostered a Zen atmosphere and, importantly, effectively masked the sound of street noise from a nearby intersection. The designer recounted that the clients reported no longer noticing traffic, despite no physical sound barrier being added.
Effective Water Features for Privacy
- Cascading waterfalls: Create white noise to mask neighborhood sounds
- Reflection pools: Draw the eye downward and inward
- Wall fountains: Combine with privacy screens for dual functionality
- Bubbling boulders: Natural-looking options for rustic settings
Defining Spaces Through Elevation Changes
One of the most underutilized privacy techniques I’ve employed involves subtle changes in elevation. Raising or lowering sections of an outdoor space creates psychological boundaries that enhance privacy without requiring tall barriers.
A meditation space designer highlights the significant role elevation changes play in fostering focus and intention. Even a slightly raised platform, they note, can effectively delineate a specific zone like a meditation area from the rest of the yard, signaling its purpose for quiet reflection.
In a recent project for a Colorado client with a sloping yard, we created three distinct “rooms” at different elevations, connected by natural stone steps. The subtle level changes made each space feel distinctly private despite being visually connected to the others.
Lighting Design for Privacy and Ambiance
Thoughtful lighting not only extends the usability of outdoor spaces but can significantly enhance privacy, especially in the evening hours when outdoor living is often most desirable.
Privacy-Enhancing Lighting Techniques
- Downlighting: Illuminate your space without creating light pollution for neighbors
- Path lighting: Define boundaries and transitions between spaces
- Uplighting: Highlight privacy structures and plantings
- String lights: Create a ceiling effect that defines intimate areas
- Recessed lighting: Integrate into steps and structures for subtle definition
“For our backyard retreat in Monument, we installed recessed lighting in the steps connecting different outdoor rooms. This not only provides safety but also defines the spaces beautifully in the evening as well as daytime,” shares a satisfied client.
Case Study: Creating a Meditation Space in a Corner Lot
When designing a meditation retreat for clients with a corner lot exposed to two streets, we employed multiple privacy strategies to create a sense of seclusion:
- Location selection: We chose a quiet corner furthest from street intersections
- Elevated platform: A slightly raised wooden deck created psychological separation
- Pergola framework: Provided structure and partial overhead coverage
- Strategic plantings: Tall ornamental grasses created movement and filtered views
- Sound masking: A small bubbling water feature covered traffic noise
- Material harmony: Used natural stone, wood, and metal elements that complemented home architecture
“What surprised me most about this project was how quickly the space felt established,” I recall. “Within one season, the grasses had filled in, and the clients reported feeling completely secluded despite being just feet away from a public sidewalk.”
Maintenance Considerations for Privacy Features
Creating privacy is only half the challenge; maintaining it requires thoughtful planning, especially with living elements.
Landscape professional Trevor Briggs emphasizes the importance of considering the client’s capacity and willingness for upkeep during the design phase. He warns that neglecting maintenance planning can lead to privacy features failing over time if they become too burdensome to manage.
Low-Maintenance Privacy Solutions
- Composite materials: Require minimal upkeep compared to natural wood
- Irrigation systems: Automate watering for living privacy elements
- Native plants: Choose species adapted to local conditions requiring less care
- Evergreen base plantings: Provide year-round privacy foundation
- Deciduous accents: Add seasonal interest without compromising core privacy


